

Many Hadoop distribution vendors like Cloudera or Hortonworks comes with a package including all the Hadoop related projects such as Hive, Spark etc... But for a learning purpose, it might be useful to know how to install a multi nodes Hadoop cluster manually, to see how component like HDFS or MapReduce works. This post will walk you step by step to set up a multi nodes Hadoop cluster on the cloud using AWS EC2 instances. In addition, a simple working example using Python with Hadoop Streaming is described.
The cluster will have:
- 1 Master (NameNode and Secondary NameNode)
- 2 slaves (DataNode)
Creating AWS EC2 instances
Choose Instance type
I assume you already have an AWS account, if not, refer to this link.
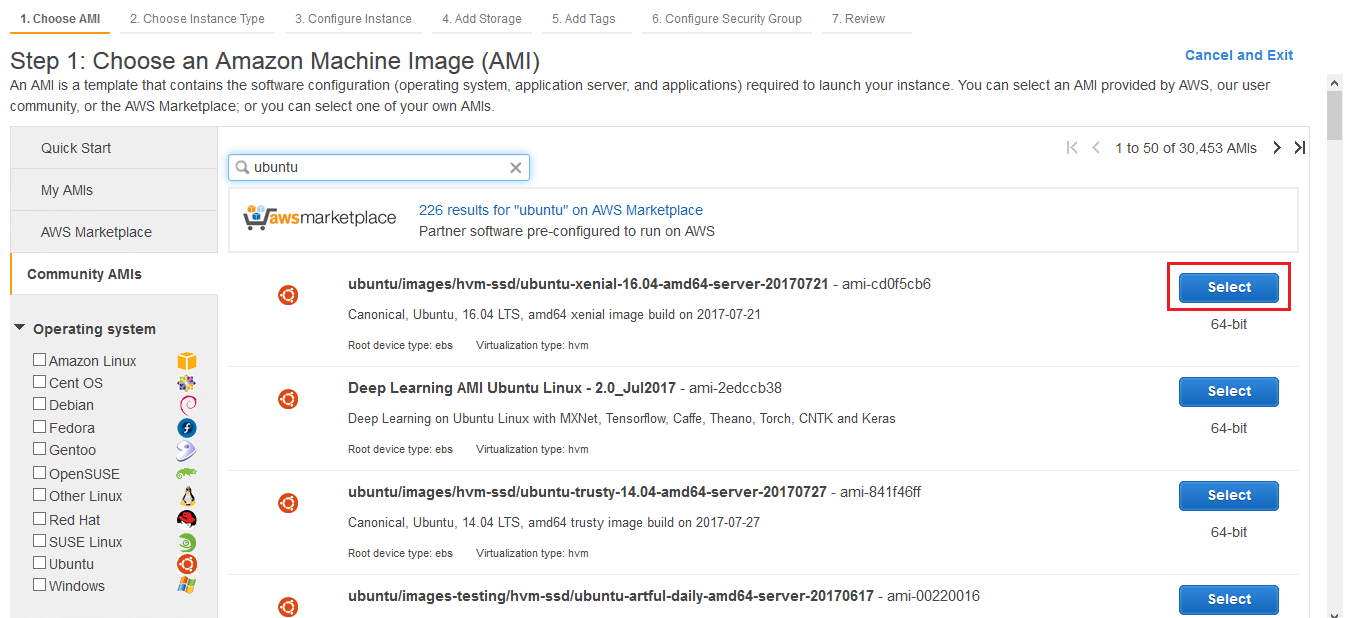
Choose the EC2 service, and click on Launch Instance, then choose a Ubuntu Image for your instance:
Then choose a m4.large for the instance type. Indeed, Amazon EC2 comes with eligible free tier instances (t2.micro) but this instance type doesn't have enough RAM to handle the Hadoop distribution and MapReduce job, consequently, memory leak or other bugs might occur later. A m4.large instance will cost you \$0.1/hour (on-demand pricing).
Then, choose a size for the storage, (minimum 8Gb). The m4.large instance only support EBS, a persistent storage, which is not physically attached to the instance, and won't disappear after the instance stops. This is particularly interesting, since I want to regularly stop my cluster when I don't use it (for the learning purpose).
Instances number and details
Here, choose a default Network or your own VPC and a subnet. The Auto-assign Public IP option lets you choose between letting AWS choose for you randomly a public IP address or having your own Elastic IP address (which comes with a price, only one is offered for free though), that doesn't change each time you restart your instances, unlike the Auto-assign Public IP option. However, the instance's private IP address doesn't change after you stop your instance: this is particularly useful in your masters and slaves files configuration later.
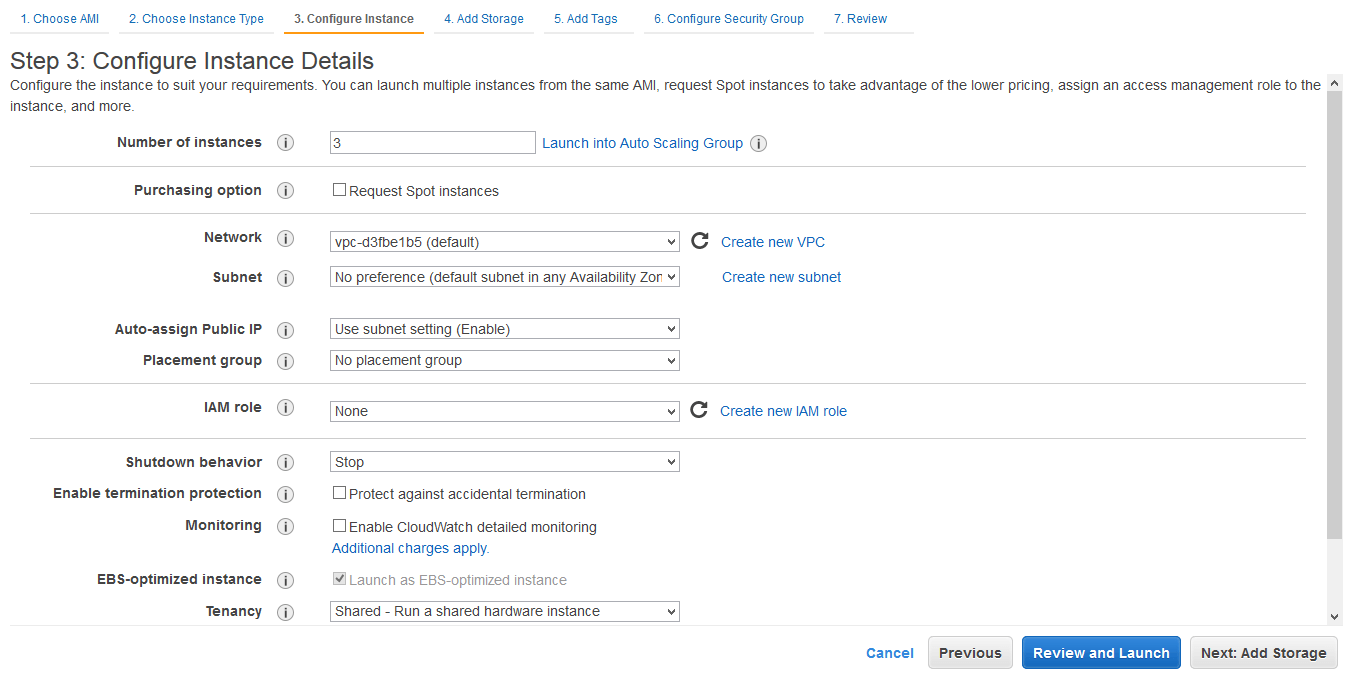
Then you can Add Tags, to easily find your cluster information later.
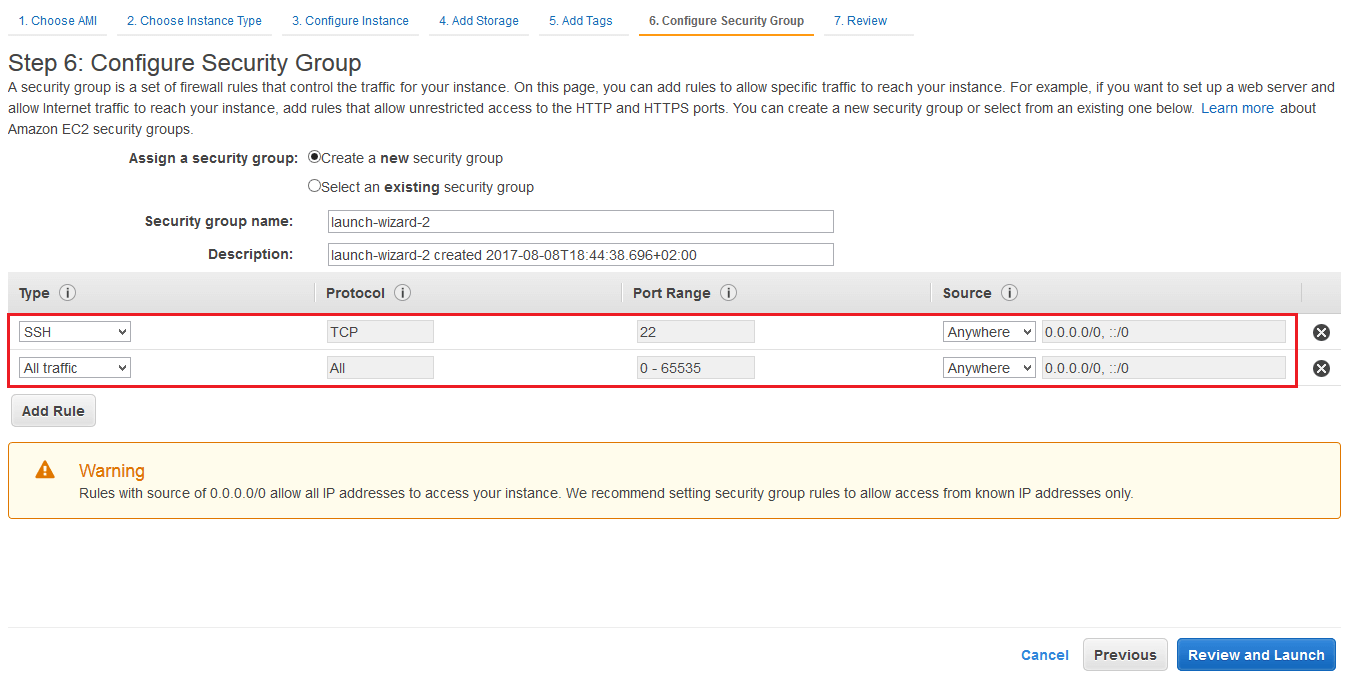
Security Group Configuration
Then, Configure Security Group allows you to define rules regarding the access to your instances or from your instances. Here I just allow SSH and all traffic from and to my instances, if not well configured, it might prevent you from accessing the Hadoop Web UI for example.
Finally, click on Review and Launch. Now choose your Amazon EC2 key-pair. If you don't have one, refer to this link.
Java and Hadoop installation
Each node in the cluster must have Java and Hadoop installed. To do so on Ubuntu:
sudo apt-get update
sudo apt-get install default-jre
sudo apt-get install default-jdk

wget apache.mirror.gtcomm.net/hadoop/common/hadoop-2.8.0/hadoop-2.8.0.tar.gz
sudo tar xzf hadoop-2.8.0.tar.gz
Then, add this to your .bashrc or .profile file.
export JAVA_HOME=/usr/lib/jvm/java-1.8.0-openjdk-amd64
export PATH="$PATH:$JAVA_HOME/bin"

export HADOOP_HOME=/home/ubuntu/hadoop-2.8.0
export PATH=$PATH:$HADOOP_HOME/bin
export PATH=$PATH:$HADOOP_HOME/sbin
Run the following (only once on one of the nodea) to format the Hdfs.
hadoop namenode -formatEnable SSH
First, for Windows users like me, please refer to this article which explains how to remotely access to your EC2 instances using Putty, and WinSCP.
Simply put, the thing with the SSH is to allow the Master node to access to the slaves nodes, and run the HDFS and Yarn deamons on the specified nodes. Each time you run the start-hdfs.sh and start-yarn.sh commands on the Master node, the master node goes through the masters and slaves file in the \${HADOOP_HOME}/etc/hadoop directory, and then access via SSH to all the nodes listed in this file to run the HDFS and Yarn deamons. But accessing via SSH requires a password, so in order to avoid having to type the password for each SSH access to nodes in the cluster, each time the commands start-hdfs.sh and start-yarn.sh are run, we are going to set a password-less SSH access.
Run the following command on the Master node:
ssh-keygen -t rsa -P '' -f ~/.ssh/id_rsa
cat ~/.ssh/id_rsa.pub >> ~/.ssh/authorized_keys
chmod 0600 ~/.ssh/authorized_keys
This will generate a public key for the Master node, then we will append this key to all the slaves nodes' authorized_key file in their ~/.ssh directory.
Now run the command to test your access to your own machine and to slaves machine:
ssh localhost
ssh <slaves_public/private_IP>
Hadoop configuration files:
Everytime we set up a Hadoop cluster, 4 main files must be configured in order to specify to Hadoop various configuration like whether to launch in a pseudo-distributed mode (single node cluster) or fully distributed mode (multi nodes cluster).
For a fully distributed mode, add the following in these files:
hdfs-site.xml
<configuration>
  <property>
        <name>dfs.replication</name>
        <value>2</value>
  </property>
  <property>
    <name>dfs.namenode.name.dir</name>
    <value>/home/ubuntu/hadoop-2.8.0/namenode</value>
  </property>
  <property>
    <name>dfs.datanode.data.dir</name>
    <value>/home/ubuntu/hadoop-2.8.0/datanode</value>
  </property>
</configuration>
The replication value determine the number of each HDFS block being duplicated and distributed across the nodes in the cluster. The namenode and datanode folders will be created on respectively the master node and the slaves nodes.
core-site.xml
<configuration>
    <property>
        <name>fs.default.name</name>
        <value>hdfs://<masters_private_IP>:9000</value>
    </property>
    <property>
      <name>hadoop.tmp.dir</name>
      <value>/home/ubuntu/hadoop-2.8.0/tmp</value>
      <description>A base for other temporary directories.</description>
    </property>
</configuration>
The fs.default.name value specifies the IP address of the master node.
yarn-site.xml
<configuration>
  <property>
      <name>yarn.nodemanager.aux-services</name>
      <value>mapreduce_shuffle</value>
  </property>
  <property>
      <name>yarn.nodemanager.auxservices.mapreduce.shuffle.class</name>
      <value>org.apache.hadoop.mapred.ShuffleHandler</value>
  </property>
  <property>
      <name>yarn.resourcemanager.hostname</name>
      <value><masters_private_IP></value>
      <description>The hostname of the Ressource Manager.</description>
  </property>
</configuration>
Same here, we specify the IP address of the master node. In both cases, I specify the private IP address, which doesn't change when the instances are restarted, so I don't have to update these files each time I start the cluster.
mapred-site.xml
<configuration>
    <property>
        <name>mapreduce.framework.name</name>
        <value>yarn</value>
    </property>
</configuration>
masters
In this file, we are going to add the private IP address (same reason as previously) of the master node.
slaves
We add all the slaves private IP address, one by line. Another method is to map each machine's IP address to a human readable name like slave1, slave2 in the /etc/hosts file, but the method might lead to some errors I encountered before, so I prefer to put directly the IP addresses.
After that, run the following on the Master node to start all deamons across the cluster:
start-dfs.sh
start-yarn.sh
You should see this:
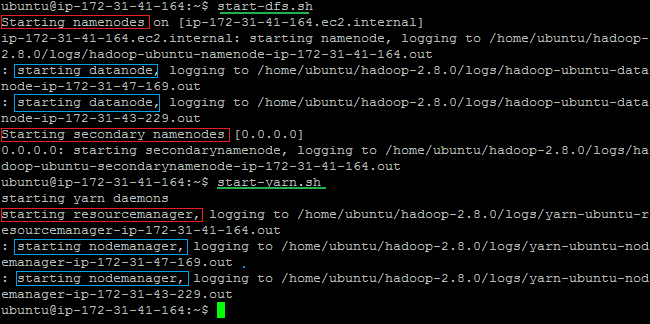
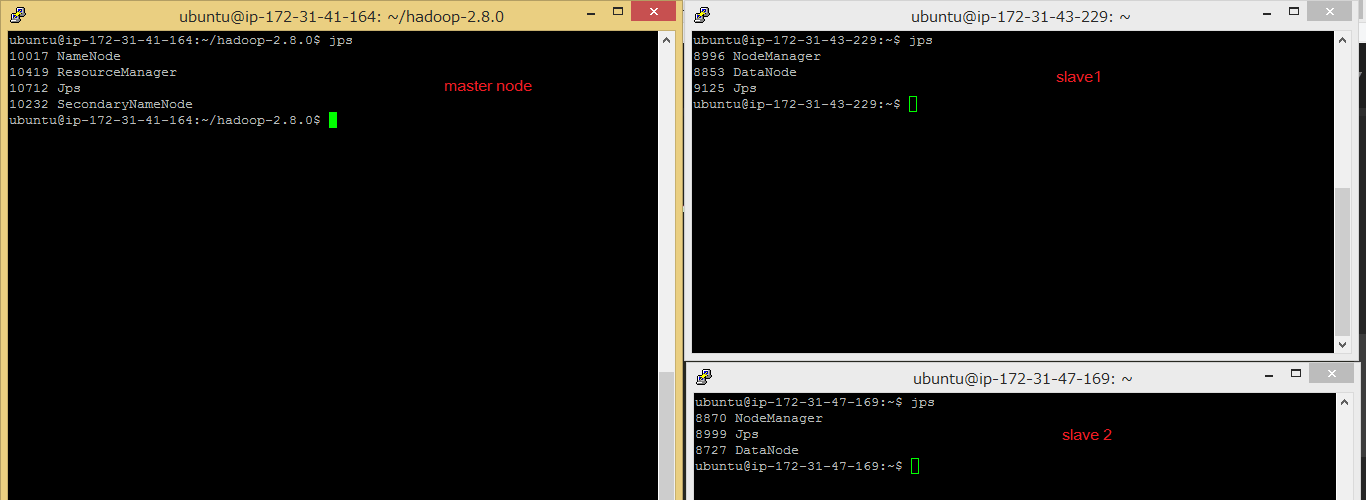
In red, deamons that will start on the Master node and in blue, deamons that will start on all the slaves node. Note that the SecondaryNameNode's address is 0.0.0.0, in other words, localhost, which means that the SecondaryNameNode will be on the same machine as the one who started the deamons, that is, the Master machine.
Then run jps command on each node to verify that the all the deamons are launched properly:
Testing the cluster using Hadoop Streaming
Mapper and Reducer codes
Once the cluster is set up, we want to test that MapReduce jobs can be run properly. To do so, we can run a Java built-in example, but for those who cannot write MapReduce codes in Java, we are going to use the Hadoop Streaming that allows to write the codes in any languages. Here Python will be used, and the mapper and reducer codes are a slightly modified version from Tom White in his book Hadoop: The Definitive guide. The mapper map the (valid) temperature for each year, and the reducer find the maximum value for each year.
Here's the mapper code:
#!/usr/bin/ python3

import re
import sys

for line in sys.stdin:
  val = line.strip()
  (year, temp, q) = (val[15:19], val[87:92], val[92:93])
  if (temp != "+9999" and re.match("[01459]", q)):
    print ("%s\t%s" % (year, temp))
The reducer code:
#!/usr/bin/ python3

import sys

(last_key, max_val) = (None, -sys.maxsize)  # the previous sys.maxint was removed in Python3
for line in sys.stdin:
  (key, val) = line.strip().split("\t")
  if last_key and last_key != key:
    print ("%s\t%s" % (last_key, max_val))
    (last_key, max_val) = (key, int(val))
  else:
    (last_key, max_val) = (key, max(max_val, int(val)))

if last_key:
  print ("%s\t%s" % (last_key, max_val))
And the sample input file:
0067011990999991950051507004+68750+023550FM-12+038299999V0203301N00671220001CN9999999N9+00001+99999999999
0043011990999991950051512004+68750+023550FM-12+038299999V0203201N00671220001CN9999999N9+00221+99999999999
0043011990999991950051518004+68750+023550FM-12+038299999V0203201N00261220001CN9999999N9-00111+99999999999
0043012650999991949032412004+62300+010750FM-12+048599999V0202701N00461220001CN0500001N9+01111+99999999999
0043012650999991949032418004+62300+010750FM-12+048599999V0202701N00461220001CN0500001N9+00781+99999999999
Important: the shebang at the first line specifies which version of Python is used. You have to check where Python is installed on your machine. I slightly modified Tom's code to run on Python3.
HDFS files
The next step is to copy the mapper and reducer code and the input sample file into HDFS. Start with creating a user folder:
hdfs dfs -mkdir /user
hdfs dfs -mkdir /user/ubuntu
Then, put the codes on your master node, then copy them to HDFS with:
hdfs dfs -put <your files>By default, if we don't specify the destination, HDFS will put in the /user/ubuntu directory.
Note: as soon as you copy a local file to HDFS, the file will be duplicated across nodes in the cluster with the the replication factor specified by the value in hdfs-site.xml file. If the file is larger than the HDFS size block, (default to 128 Mb). it gets partionned into fixed size blocks and are distributed across the cluster (not to all slave nodes though, see how HDFS distribute data across the cluster).
Now run the MapReduce job:
hadoop jar /home/ubuntu/hadoop-2.8.0/share/hadoop/tools/lib/hadoop-streaming-2.8.0.jar \
-files max_temperature_map.py,max_temperature_reduce.py \
-input sample_temperature.txt \
-output output \
-mapper "python3 max_temperature_map.py" \
-reducer "python3 max_temperature_reduce.py" \
Important:
- the -files argument allows HDFS to ship the mapper and the reducer codes to all slaves nodes, that is, the slaves know where to get the codes. Moreover, shipped files with the -files argument must be present in HDFS.
- You must specify the "python3" keyword in the -mapper and -reducer argument, otherwise errors occurs.
- Set permissions to the mapper and reducer codes to avoid Permission Error, using hdfs dfs -chmod 777 <file_name>.
Once the job finished, you can see in the output directory 2 files: _SUCCESS (empty file) and part-00000 that contains the final result. Here we get for each year, the highest temperature:
1949   111
1950   22
To copy these files, run:
hdfs dfs -copyToLocal output/*Web UI for monitoring jobs and HDFS
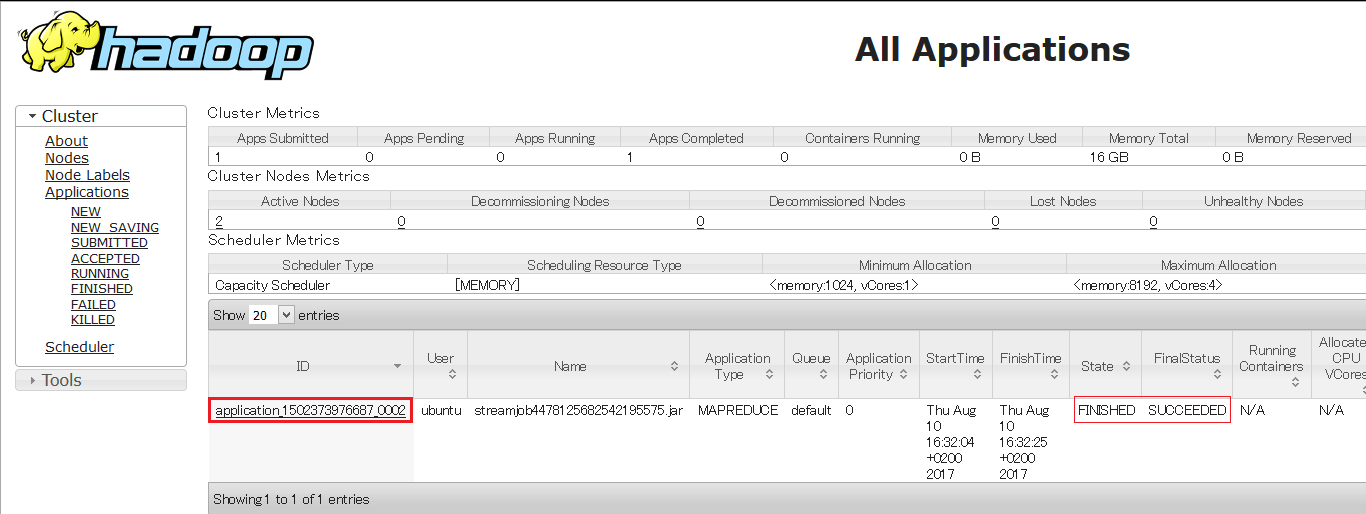
You can monitor, see jobs status by going to the URL: <master_node_public_IP:8088>. You can check the status of the job with its job ID as shown below:
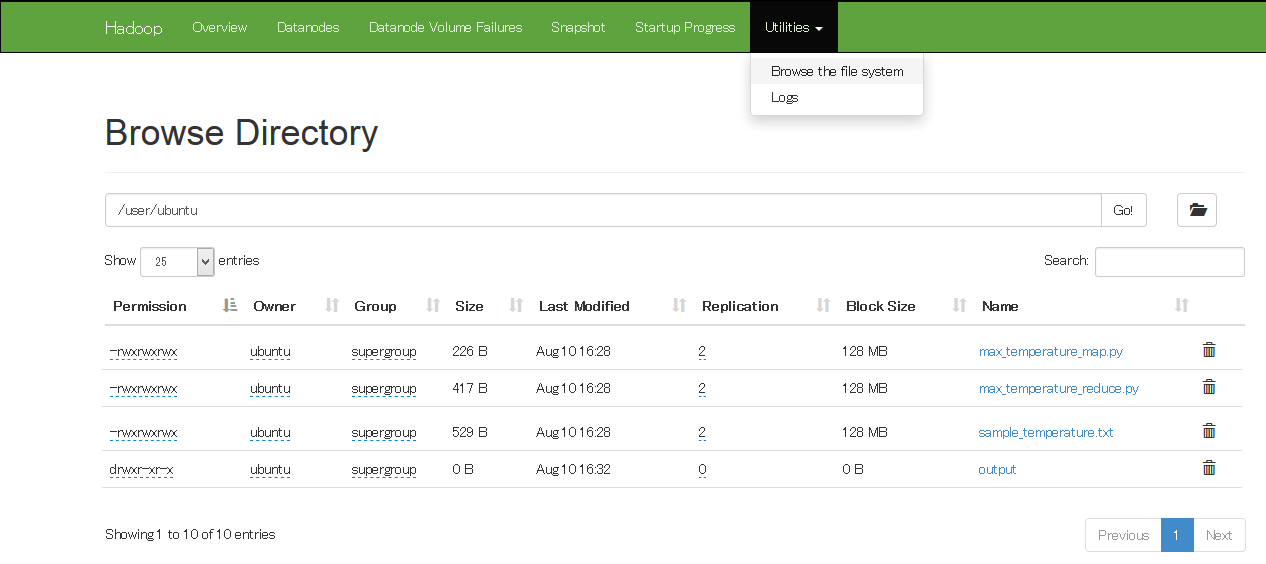
And you can check the content of the HDFS, the number of blocks being distributed, by going to <master_node_public_IP:50070>.
Next step
Now that you're able to set up a Hadoop on the cloud and can write MapReduce codes in Python, the next step might be to consider libraries like Mrjob that take care for you for complexe multi-step in your MapReduce codes. Hope you find this post useful !


© 2020, Philippe Khin